Friday, October 28, 2011

Nutella Smooches

I saw these cookies on the food network and after a long week of thinking about them, I knew they were exactly what I wanted to eat in place of dinner tonight. When they were finally done and the perfect combination of chewy chocolate and hazelnut, I knew these were a keeper.


What you'll need:
1 3/4 cup all-purpose flour
1 teaspoon baking soda
1/2 teaspoon salt
1/2 cup + 2 tablespoons Nutella
1/2 cup butter, softened (1 stick)
1/2 cup sugar
1/2 cup light brown sugar
1 egg
1 teaspoon vanilla extract
1/2 cup orange sprinkles, or orange sugar
1 (9-ounce) package of Hershey's kisses or mini kisses

How fabulous is this orange sugar I picked up from Target?!
Definitely bizarrely neon orange, but perfect for a little Halloween spirit.
This recipe is adapted from Giada De Laurentiis
Preheat the oven to 375 degrees.
In a medium bowl, combine flour, baking soda, and salt. Set aside.
In another medium bowl, place the chocolate hazelnut spread, butter, and both sugars. Using a hand mixer, cream the ingredients together, about 3 minutes. Add the egg and vanilla and blend until incorporated. Stir in the dry ingredients, just until incorporated.
Shape the cookie dough into walnut-sized balls. Rolls the balls in the sprinkles, pressing to adhere. Place the cookies on a heavy cookie sheet about 4 inches apart. Bake for 6 minutes. Remove the cookies from the oven. Quickly place a chocolate kiss, or 3 mini kisses in the middle of each cookie. Return the cookies to the oven and bake for another 3 minutes. Cool the cookies on a wire rack.


Go crazy with the sprinkles--purple and orange make the perfect Halloween dessert.

Eat warm and enjoy!

Tuesday, October 25, 2011

Margaret's Apricot Glazed Sausage and Parmesan Crusted Squash

Margaret makes delicious sounding food all of the time and she thankfully shared some of her amazing recipes with me.  These two sound perfect for a fall evening.

Apricot Glazed Sausage With Onion and Sage
Heat olive oil in a pan over medium heat. Chop a large yellow onion into 1/2" wedges, and place in the oil with 6 sausages - I used a low-fat chicken apple sausage. Let them cook until the sausages are browned and cooked through and the onions are translucent. 
Pour apricot nectar into the pan until the sausages are almost completely covered.  Add 10 sage leaves and season with salt and pepper. Reduce heat to medium-low and let pot stay at a low simmer until the nectar has condensed into a thick syrup. The onion will caramelize, and the sausage will be extra juicy. 
Parmesan Crusted Butternut Squash:
Take 1 large butternut squash, peeled, and halved lengthwise. Cut into 1/2" slices. Place on baking sheet, drizzle with olive oil, and sprinkle salt, pepper, rosemary on top. Pour a generous amount of parmesan on each slice, and bake at 400 until cooked through (Approx. 30 minutes) The parmesan should melt into a crust on top of the squash, and the squash should be soft and warm throughout. 
 
Eat together and enjoy!
 
Note: Both of these recipes are adapted from the Noble Pig's food blog. (I used butternut squash instead of acorn squash, and rosemary instead of thyme. In the sausage recipe, I used apricot instead of apple cider)

Monday, October 24, 2011

Lisa's Almond Butter Chocolate Chip Cookies :)

My friend Lisa shared this recipe with me and it looks absolutely amazing!  I can't wait to try them myself and I'm thinking this might be the perfect excuse to not finish my work tonight...

What you'll need (makes 2 dozen):
4 tablespoons salted butter (1/2 stick)
⅔ cup brown sugar, packed
¼ cup granulated sugar
½ cup natural almond butter
½ teaspoon vanilla
1 egg
¾ cup flour
1 teaspoon baking soda
½ teaspoon salt
½ teaspoon cinnamon
1 cup oats
¾ cup semisweet chocolate chips

Preheat oven to 350.
Combine flour, baking soda, salt & cinnamon in small bowl.
Melt butter in a large bowl on low on the stove.  Add the almond butter, sugars, vanilla, and egg and whisk until smooth.  Depending on the type of almond butter you use, you may find this is significantly easier with an electric mixer. 
Stir in flour mixture with a spatula.  Stir in the oats & chocolate chips.
Note that the dough does not hold together right off the bat and you will need to roll it a bit with your hands to get a good clump for baking.  Create balls a little smaller than a golf ball and place onto baking sheets lined with parchment paper.   Bake for 8-10 minutes until light brown on the edges. 
The trick to keep these cookies from falling apart is to let them cool on the cookie sheet.  After five or so minutes, transfer to a paper towel and let them finish cooling.
Enjoy!

Sunday, October 16, 2011

Garlic Poached Chicken with Napa Cabbage and Rice Noodle Stir Fry

This is a perfect Sunday night meal--light enough to forgive the previous few meals you've eaten (Saturday night and Sunday brunch gluttony, usually) but delicious enough to be pseudo-comfort food.  It is also a perfect meal to make for yourself in a large batch for the week, and just as perfect to make a small portion for gals who live alone, like moi.

What you'll need: (serves 2)
2 boneless chicken breasts
1 head of napa cabbage
enough rice noodles to feed two people 
6 garlic cloves (3 chopped, 3 whole)
a splash of sherry or sake

For the sauce (simply combine in a bowl and whisk till incorporated):
2 tablespoons low sodium soy sauce
1 tablespoon fish sauce
1 tablespoon rice wine vinegar
1 tablespoon vegetable oil
1 tablespoon toasted sesame oil
1 tablespoon brown sugar

Begin by placing the chicken breasts in a small pot and filling it with water until it just covers the chicken.  Add a splash of sherry and put in 3 whole peeled garlic cloves.  Cover and heat until boiling, and then take off the heat and let it sit, covered for 10 minutes.  

After ten minutes, check to see if the chicken is cooked through by making a cut in the middle.  If it's not done, cover again for about 5 minutes.  When the chicken is done, it'll be really moist so take it out of the water and cover with aluminum foil to retain the heat/moisture while you cook the rest of the meal.  

When the chicken is cooked through, skim anything left in the water from the chicken and bring it back to a boil.  Put the rice noodles in and cook about 7 minutes until tender (or follow the instructions on the packaging if it says differently). While the rice is cooking, chop the cabbage into 1 inch pieces and clean thoroughly.  

Heat a wok or heavy skillet and add pam or a bit of vegetable oil and the 3 chopped garlic cloves.  When the garlic becomes fragrant, put the cabbage in and sear on high heat until tender crisp.  Put the noodles in with the sauce (just enough to cover everything) and heat through.  Shred the chicken with your fingers and throw it in at the very end just so it gets covered with the sauce. 
Eat with chopsticks and enjoy!

Friday, October 14, 2011

Apple Butter

The first time I tried apple butter was when my friend, Rel, introduced it to me in college.  I had been missing out--apple butter is a sweet, tart, tangy and creamy concoction that tastes like fall in a jar and that, surprisingly, is made up of little else other than apples.  You can put it on toast, on sandwiches (recipe to come soon!) in yogurt or cottage cheese.  The recipe for apple butter is fairly easy but takes a really long time in the crockpot so be prepared to put it in early in the day, or leave it over night.  I enjoy my apple butter on the darker side, as the longer it cooks, the sweeter and creamier it becomes.  Mine took 12 hours overall!

What you'll need:
about 6 pounds of apples (ask your farmer's market for less sweet apples--I used a mix of granny smith, jonagold and gala)
1/4 cup sugar (optional and you can leave this out entirely if your apples are sweeter)
1 tablespoon cinnamon
1 crockpot

Start by peeling and coring all of your apples.  Cut them into chunks and pulse them in your food processor until they are almost pureed.  Then, put them all into the crockpot with the cinnamon and heat on high for 3 hours.  After 3 hours, put the mixture back into the food processor or a blender and blend until completely smooth.  Put back into the slow cooker and keep it on low for about 9 hours.  Stir occasionally.  
 
About an hour before the butter is done, taste the butter and add sugar if it isn't sweet enough.  When you've finished cooking, place in cute glass jars, close them, and let them cool down.  Put them straight into the fridge when they've cooled.  You can use an old jam jar or find some pretty jars at Home Goods, TJ Maxx or Amazon.  When you put a ribbon around it, it becomes a perfect fall gift.  Enjoy!

Thursday, October 13, 2011

Crab Rangoons

MMMM fried wontons stuffed with crab, cream cheese and scallions.  I made these as a special treat for my friend who loves ordering crab rangoons in chinese restaurants but hasn't been able to find them here in New York.  Suggestions on where to find them, anyone?  Anyway, we enjoyed these while watching the Emmys and just after Modern Family had won it's fifth award, these were about all done.

What you'll need: (makes about 15-20 depending on how much filling you use)
Square wonton wrappers
8 ounces cream cheese
1 6 ounce can of white crab meat
2 scallions
Enough vegetable oil to coat the bottom of your pan, about 1/8 inch high
salt and pepper
A small bowl filled with water for wetting the wontons

Begin by mixing the crab, cream cheese and chopped scallions in a bowl. 
Put a rounded tablespoon in the middle of the wonton wrapper and wet the inside edge of the wrapper.  Press firmly down and make sure there are no holes because the filling will splatter in the hot oil.  Cover the filled wontons in a damp paper towel while you are working so they don't dry out.
Coat the bottom of your pan with the oil and heat until sizzling.  Place a few wrappers into the pan, but don't crowd  it.  Cook about 1 minute on each side, checking carefully that they aren't burning.  The wrappers should be crisp and golden.  Lay them on paper towels when done to absorb any extra oil. 
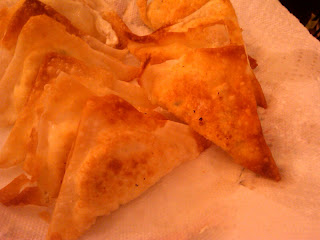
 Serve with sweet chili sauce or hoisin sauce to dip in and enjoy! 

Sunday, September 25, 2011

Apple Cake Bread

FALL IS HERE!  And so are apples...so here's to some gooey cinnamon apple goodness.  This loaf-cake is crispy on top and warm and soft on the inside, with tart apple bites strewn throughout.  Pick up some apple cider at the farmer's market to complete a really delicious snack, dessert or breakfast.
What you'll need:
3 cups all-purpose flour
2 teaspoons cinnamon
1 teaspoon baking soda
1/2 teaspoon baking powder
1/2 teaspoon salt
1/2 cup vegetable oil
1 cup brown sugar
1 cup white sugar
2 eggs, beaten
1/2 teaspoon vanilla
2 large granny smith apples, roughly chopped
3 tablespoons sugar+1 tsp cinnamon, set aside
Preheat oven to 350 and in a large mixing bowl, combine flour, cinnamon, baking soda, baking powder and salt and set aside. In a separate mixing bowl, place oil, sugar, eggs, vanilla and apples. Stir this mixture into the flour mixture until fully combined. Place the dough in one greased bread loaf pan and bake for 25 minutes.  
 
Take the pan out and sprinkle cinnamon sugar mixture on top.  Bake for another 25 minutes, until golden and crispy on the outside and warm and gooey, but not raw on the inside.  Let cool for ten minutes, and then enjoy!
 

Friday, September 16, 2011

Pumpkin Sandwich Bread

Looking forward to fall?  Try making this pumpkin bread.  This is not the uber sweet pumpkin bread topped with cream cheese frosting you see around Thanksgiving (although I have no objections to that kind!).  Rather it is light and mild, with just a touch of pumpkin flavor--perfect with just a little butter or for a turkey sandwich.  You'll probably see me top it with turkey and apple butter in the near future!  I didn't take pictures until the end because the process was messy.  I was covered in flour and pumpkin by the end--But it was worth it.

What you'll need:
2 bread loaf pans
1/2 cup warm water
2 packages active dry yeast
2/3 cup warm whole milk
2 large eggs, beaten
1 1/2 cups canned pumpkin puree
2 tablespoons vegetable oil
6 1/2-7 1/2 cups (approximately) Unbleached All-Purpose Flour
1/2 cup brown sugar
2 teaspoons salt
1/2 teaspoon ground ginger
1/2 teaspoon ground cinnamon

In a large bowl, stir yeast into water and gently whisk. Add milk, eggs, pumpkin, oil, 4 cups flour, brown sugar, salt, ginger and cinnamon to yeast mixture. Beat vigorously for 2 minutes.  Or, wrestle with the dough until you get frustrated and debate buying a hand mixer on amazon.

Gradually add remaining flour, a little at a time, until you have a dough stiff enough to knead.  Or, when the mass becomes manageable enough to take it out of the bowl. Turn dough out onto a floured surface. Knead, adding flour as necessary, until you have a smooth, elastic dough.  This took me 7 1/2 cups of flour in total!  When you finally get this beast under control, put the dough into an oiled bowl. Turn once to coat entire ball of dough with oil. Cover with a towel and let rise until doubled, about 1 hour.
Take the dough out onto a lightly oiled surface.  Any area that is not oiled will get covered in pumpkin dough and will.not.come.off.  So lightly oil everything. Divide the dough in half and place in 2 loaf pans. Cover with a towel and let rise until almost doubled, about 45 minutes.  FINALLY bake in a preheated 375°F oven for 30 minutes. Immediately remove bread pans and cool on a wire rack to prevent crust from becoming soggy. For a shiny crust, brush tops of bread or rolls lightly with vegetable oil. 
 
Enjoy while warm!

Tuesday, September 13, 2011

Chicken Lettuce Wraps

I love chicken lettuce wraps!  I think they are the perfect crispy salty meaty combination.  Invariably there were always ordered and completely demolished when we went to Cheesecake Factory in St. Louis (is it weird that I miss that place?).  This however, is a fine substitute and SO easy to make, I can't believe I haven't made it before.
What you'll need:
1 head iceberg lettuce
1 pound ground chicken
1/2 zucchini, finely diced (use the whole zucchini if you want to up the veggie factor)
1 can diced water chestnuts
2 garlic cloves
1/2 chopped white onion
2 tablespoons vegetable or canola oil
for the sauce:
2 tablespoons hoisin
2 tablespoons ketchup
3 tablespoons soy sauce
1 tablespoon fish sauce
1/2 tablespoon rice wine vinegar
sriracha to taste

Start by chopping the garlic and veggies.  Wash and dry the lettuce and set aside.
 
Heat the oil in a wok or large heavy pan and add the onions when the oil is smoking.  When the onions turn translucent, add the garlic and saute for 30 seconds.  Add the chicken and 1/2 the sauce.  Break up the meat with a wooden spoon and saute on high heat until the chicken is cooked through.  When the chicken is totally cooked through, drain the pan of the juices at the bottom.
 
Then add the finely diced zucchini, the water chestnuts and the rest of the sauce.  Saute for about a minute until the sauce is absorbed and the zucchini cooked through. 
Serve with white rice, hoisin and extra sriracha.  Eat and enjoy!!

Monday, September 12, 2011

Fig Orange Jam and Prosciutto Goat Cheese Jam Crostini

Ever get the Martha Stewart-bug and feel like doing things you've never done before, like...make jam?  If you haven't, just ignore this post.  If you have, and totally want to learn how to make jam, read on!  I saw this recipe a while ago and just knew I'd have to try to make jam at least once this summer--I absolutely love figs, so I thought this sounded amazing.  When I found a beautiful box of them at the farmer's market, I realized it was time--I was ready to jam.  This stuff is so easy, because you make it in the microwave.  Yea, you read that right.  You can make jam in the microwave!  Super easy, and super delicious.  All you need in terms of kitchenware is a pyrex bowl or measuring cup, and a glass bottle to put the jam in after.  I think you can get some on amazon, but I just found a few at Home Goods for just a few dollars each.  To sterilize them, you put them in the over at 200 degrees for 10 minutes.  I don't know how long the jam will last out of the fridge, but mine has been good so far in the fridge for 2 weeks.

adapted from Allrecipes
What you'll need for the jam:
1 1/2 cups diced fresh figs (6-10 figs, depending on the size of the figs)
1/2 cup seeded, peeled orange, diced
1 1/2 cups of sugar
1 1/2 teaspoons grated orange peel
3 Tbsp lemon juice
1/4 teaspoon ground ginger
1/4 teaspoon cinnamon
1/2 teaspoon butter

What you'll need for the crostini:
1 baguette
6 ounces goat cheese
1/4 pound prosciutto

Put all of the ingredients for the jam into a large pyrex bowl and let sit for 1/2 hour or more.  If your pyrex measuring cup is large enough to hold all of the ingredients, that is fine too.   
After half an hour, put into the microwave for 5 minutes on high.  Stir after 5 minutes.  Repeat 3 times, 15 minutes in total.  By this time, the jam should be done.  The traditional test to see if it is ready is to place a drop of it on a cold plate.  If the jam somewhat holds its shape, then it is ready.  If it is not ready, put it in for 5 more minutes.  Mine took 20 minutes in total.  When it's done, put it into the glass container and let it cool down. 
Yum! 
If you want to wow some guests (and I happened to have some very special guests over that very weekend) make some crostini with your new jam!  Cut the baguette into 1/2 inch slices and place in the oven at 350 for just 5 minutes so the outside gets a little crispy.  Smear each slice with a bit of goat cheese, and then a tablespoon of jam.  Top with thinly sliced prosciutto.  The goat cheese is tangy and the salty prosciutto offsets the sweet jam.  My guests went crazy for them!! Let's just say a whole bunch of jam was consumed that night.  And red wine.  Because it goes perfectly with these crostini.
 
Enjoy!

    Sunday, September 11, 2011

    Baked Tomato Sauce and Spaghetti

    I have an unhealthy addiction to tomatoes.  I treasure them in the summer, and get weird looks when I get starry-eyed at the farmer's market looking at the brilliant selection of beautifully colored tomatoes.  I am always thinking of new ways to use tomatoes and have a long list of recipes bookmarked that use them.  Last night I wanted some comfort food, and while I love making tomato sauce with the fresh tomatoes, it's fairly time intensive, and sometimes you just want something delicious for dinner that's really really fast.  This "sauce" that I read about on Wednesday Chef caught my attention and only really needs three ingredients: tomatoes, olive oil and panko.  When added to some spaghetti will make a completely satisfying and delicious meal.

    adapted from the Wednesday Chef
    What you'll need (serves 2):
    1 pint the freshest little cherry or grape tomatoes you can find
    1/2 cup panko
    a few tablespoons olive oil
    s+p
    Enough spaghetti for 2 people(I used whole wheat which I thought went well with this lighter sauce)
    *Feel free to jazz this up with parmesan and basil, if you have it on hand.

    Start by preheating the oven to 350, and boiling a pot of salted water.  As Paula says, the water should "taste like the sea!"  Cut the tomatoes in half and place on a baking sheet.  Season with the olive oil, salt and pepper.  Then sprinkle the panko on so all the tomatoes are covered.  If you have parmesan, add that on now, as well.
    Bake at 350 for 10-15 minutes.  While baking, boil the spaghetti till al dente.  When the tomatoes are done, they should be hot and sweet, and the panko a very light brown.  Mush the tomatoes down with a fork, and then toss with the spaghetti, and a tablespoon or 2 of the starchy pasta water.  
     
    Add basil, more parmesan and a touch of olive oil.
    Enjoy!

    Monday, August 22, 2011

    How to make any market veggie taste good: baby eggplant

    This post is just a quick post, mostly for those who wander the farmers market, wanting to bring home something beautiful but wondering what in the world to do with those weird-looking greens or a new variety of squash.  I love wandering through the stalls, and always end up picking up something new to try at home.  Invariably, while I try to make new dishes, I always fall back on my trusted combination of ingredients to make any vegetable shine.  All you need is a little high quality olive oil, garlic, red pepper flakes, salt, pepper and a squeeze of fresh lemon. 
    What you'll need:
    Something new from the farmer's market! (I started with a half pound of baby eggplant)
    2 tablespoons olive oil
    3 cloves garlic, minced
    1 tsp red pepper flakes
    1/2 lemon
    salt and pepper to taste
    Step 1:
    prep the veggie by cleaning, and then chopping into manageable pieces.
    Step2:
    Heat olive oil in a pan, and when hot, add garlic.
    Step 3:
    As soon as the garlic begins to cook and fills your kitchen with wonderful smells (this will just take a few seconds) add the red pepper flakes, and saute for another few seconds.
    Step 4:
    Add your veggies!  Clearly every vegetable has a different cooking time, so you'll have to taste as you go along.  Eggplant, to me, should be soft but not totally collapsed.  Greens like spinach should be reduced but still have some girth (and should not be totally soggy).  Squash should be crisp-tender meaning soft but still with a little crunch.
    When the veggies are almost done, squeeze the lemon over the pan.
    Add salt and pepper and serve immediately.  To bring any dish to the next level, sprinkle fresh parmesan on top.  Enjoy!


    Friday, August 12, 2011

    Ricotta Crostini: 2 ways

    Today I had the luck/time/lunch buddy to go to Torrisi for lunch.  Torrisi Italian Specialties is a cute Italian hole-in-the-wall in Nolita that is a deli by day and a restaurant by night.  Their roast turkey sandwich has been considered among the best in NYC for a while now, and their prix fixe dinner is apparently unbelievable, as well as a great deal for NYC ($50 dollars for dinner--but they don't take reservations--be prepared to wait on line for a few hours!).  I, of course, had to try this famed turkey sandwich (and it did live up to the hype) but I couldn't keep myself from ordering some of their fresh ricotta to take back with me.  MAN is it good!  It is creamy, salty, smooth and I was eating it by the spoonful when I opened it up.  Once my self-control caught up with me I realized I needed to eat something else for dinner besides cheese, however delicious it was.  Crostini is the perfect vehicle, and ricotta pairs so well with salty and sweet I just had to create two types, to get the full effect.  These mini open faced sandwiches are you have the perfect way to use the freshest produce you have in your fridge (have you tasted the nectarines or peaches lately!?) and really epitomize the Italian way of cooking--the best ingredients don't need much to taste good.  Perfect for appetizers at a party, or for a whole meal if you're hanging by yourself, here are two suggestions for ricotta crostini that I hope you'll enjoy while it's still warm out.
    What you'll need (serves 2 for appetizers):
    1/2 baguette
    Ricotta cheese

    Crostini 1 (non-vegetarian):
    2 ripe nectarines
    1/4 pound good prosciutto/serrano ham/iberico ham

    Crostini 2 (vegetarian):
    Good olive oil
    Grape tomatoes

    Cut the baguette at an angle, so you have long, pretty pieces.
     
    Spread 1 tablespoon ricotta cheese on each piece.
     
     Cut tomatoes lengthwise and place atop the ricotta on your vegetarian pieces.  Lay one piece of ham on the other slices.
     
    Drizzle the tomatoes with olive oil, and place thinly sliced nectarine atop the ham.
     
    Enjoy!

    Monday, July 25, 2011

    Mexican Corn Salad

    I apologize for the abundance of corn recipes!  It's just that 1) corn is everywhere now and 2) it's sooo good!  So here you go, another corn recipe, for a light meal in this hot weather or to bring to all of those bbqs I am sure everyone is going to!
    I love this recipe because it is salty, smoky, tart and just barely creamy to bring it all together.

    adapted from Smitten Kitchen
    What you'll need: (serves 5 as a side dish)
    3 cobs of corn
    queso fresco (a Mexican, crumbly white cheese)
    1 lime
    2 tablespoons mayo
    1 tsp chili powder
    salt and pepper
    1 bunch cilantro, chopped

    Boil the corn for just 2 minutes in salted water, and then place on the grill over low heat to blacken the kernels.  Don't be afraid when some of the kernels pop!  Stop when the kernels are blackened to your liking.  The grill adds so much smokiness and totally brings this dish to the next level.
    While the corn is grilling, open your queso fresco.  Don't know what that is?  It looks like this:
    It's salty and easy to crumble, almost like feta.  
    Just take a fork and gently rake it against the block of cheese and it should crumble easily.  You'll need a few tablespoons.  
    The corn should be done now!
     Cut the kernels off the cob.
    Top with the mayo, pepper, juice of 1 lime and cilantro.
     
    Mix!
    And enjoy!